Friday, December 31, 2010

Brioche


This is a bread I've made many times before and never tire of. Eating a slice of brioche is almost like eating a slice of cake. Indeed, the famous words of Marie Antoinette "Let them eat cake" are said to be a mistranslation of "Let them eat brioche."

There are numerous good recipes for brioche. Peter Reinhart's Bread Baker's Apprentice has three of varying richness, Rich Man's Brioche, Middle-class Brioche, and Poor Man's Brioche. All are excellent. Shirley Corriher's CookWise contains two Ultimate Brioche recipes, one for bread-like brioche and one for cake-like brioche. And if you are looking for things to do with brioche, there are a number of variation to be found in Baking with Julia. So it should come as no surprise that I was eager to try Hamelman's recipe.

Brioche is a wonderfully versatile dough. When I did the Bread Baker's Apprentice Challenge, I used brioche to make pigs-in-a-blanket and Julia Child's variation on Beef Wellington among other things. I have the pans and have made the traditional brioche loaves or têtes before, but I find that shape isn't particularly useful. So this time around I began with a pullman's loaf shown above. The dough was placed in the pan in pieces, hence the segmentation you see. When done this way (an experiment), the loaf pulls apart easily as pieces, but can be sliced as well. This made great sandwiches, but I also ate a lot of it out of hand. I also used it to make cinnamon toast, eggs-in-a-basket, and bread pudding. French toast is also an obvious possibility. The dough handled pretty much as Hamelman said it would (although I didn't have his religious experience). It is a long but straightforward process.

The recipe makes quite a lot and seemed to be near the limit of what I would want to put in my mixer and more than I really need at one time. The second time around, I cut the recipe back by a third. This still made a lot of brioche to play with, about 36 ounces. I went to Baking with Julia for ideas and ended up using three recipes contributed by Nancy Silverton. I used 8 ounces to make the Savory Brioche Pockets. I took 1 ounce balls of dough and rolled them out into circles, added the filling, put another circle on top, crimped the dough, brushed with an egg glaze, and baked. The filling can be pretty much what ever you want making this a great general purpose recipe. (Silverton's recipe calls for potatoes, goat cheese, and asparagus which is what I used, but there is no reason to stick to this.)

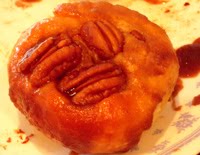
I used 18 ounces to make a pan of Pecan Sticky Buns. I skipped the lamination step (using brioche and additional butter to make a simple laminated dough) but the results were plenty rich without the added butter. (The original recipe, which is quite involved, is extraordinary, the best sticky buns I've ever had or am likely to ever have.) The remaining dough went to make a few Twice-Baked Brioches, little brioche rolls with an almond cream topping. That's quite a lot of product considering I was only using 2/3 of the original recipe.

Overall, Hamelman recipe is great, but then there are numerous other excellent recipes for brioche. How can you really go wrong with a dough that is so very rich? And so versatile?

Another favorite!

Horst Bandel's Black Pumpernickel


This is an extremely interesting loaf to make, but one that I'm not likely to repeat. It was certainly the most complex bread I've made thus far, a bread with a preferment and two soakers. I made this loaf a single time, which for me, is quite enough. While I can appreciate this bread, overall it really isn't to my tastes.

The ingredient list was problematic as it calls for rye meal, rye berries, and rye chops among other things. I used King Arthur's pumpernickel flour as the rye meal. My rye berries came from Whole Foods. The rye chops I made by putting rye berries in a food processor. This took a while and gave both the chopped pieces and rye flour. As has become my habit, I mixed the high gluten flour by adding vital wheat gluten to KA's bread flour. Also, I used regular molasses rather than black strap molasses.

When I began mixing the dough, it seemed too dry so I added 4 ounces of water. As it turned out, I was too hasty. Over the course of mixing the bread, I needed to add in an additional 10 ounces of flour to get the right consistency. Keep in mind, the recipe makes a 4 pound pullman's loaf, so the additions, while not desirable, were not a drastic as they might seem.

Following the recipe, the loaf was baked, left in the oven over night, and went through another day of resting before it was cut. The loaf pulled in slightly from the pan, so was easy to remove although quite a bit of moisture accumulate in the pullman pan.

The loaf was quite dark, darker than any loaf I've made, but I wouldn't describe it as almost black as did Hamelman. The loaf was also quite dense. This is a loaf to be sliced thin and served with a strong cheese or sausage, something that can stand up against the bread.

Overall, I learned a lot in the process, and I'm glad I made the bread. I can certainly appreciate the quality of the bread. But, overall, this isn't the kind of bread I crave. I'm afraid, that despite the effort, most of the loaf went uneaten.

Country Bread


Editorial Note: It has been a while since I've posted anything. I've still been baking, taking notes and pictures, and occasionally writing my blog comments out by hand for later postings. However, this isn't the same as writing the posts while they are fresh in my memory. For this I apologize.

The country bread recipe is a very nice, straightforward bread that is easy to make. It would be an ideal starting point for a beginner. There are no surprises here. Just follow the recipe. I maded this a couple of times. On both occasions, I shaped the loaves as fendu or split loaves. (You can see this better in the second picture.) I find this very easy to do, and the finished loaf is a useful shape. Moreover, I don't have to mess with slashing the loaves.

This was quite similar to the rustic bread, the next recipe in the book and a loaf that was baked earlier in the challenge. Frankly, I slightly prefer the rustic bread as it has a slightly more complex flavor due to the addition of a small amount of whole-wheat flour and whole-rye flour. There is enough of each to add flavor but not dominate the overall taste of the bread.

For the second preparation, I added 20% fresh asiago cheese to the bread as per the cheese bread recipe. This is shown in the second picture. You can see a bit of leakage at the bottom of the loaf.

All said and done, this may not be may absolute favorite, this is a good, solid recipe that is well worth repeating.

Sunday, October 24, 2010

Challah Revisited


Please note, the corrected amount of yeast for this recipe for the home cook is 9 grams of dry instant yeast. I have revisited this recipe using the Hungarian Ring as shown. This proved to be considerably more difficult than the star. With any braid, including the star, the strands tend to rise against each other giving a more even loaf. With the Hungarian braid, the individual strands stand out. If they are ill-formed, they remain ill-formed throughout the rise and baking process.

Rolling out the 4-foot outer ring was also a task. I repeated had to stop and allow it to rest. I had used an overnight retard. Hamelman suggest that this makes rolling the bread easier. I hate to think what it would have been like without that rest.

Also, as you can see, I had some difficulty sealing the interior pieces to the outer ring. During the cooking process, they tended to release, stand-up, and then overbrown.

Yeast Calculation

In calculating the yeast quantities in previous postings, I overlooked the switch from fresh yeast to instant dried yeast when going from production batches to home batches. As Hamelman notes on page 57, 1/3 as much instant yeast is needed. Thanks to Paul Yumarama for pointing this out!

Sunday, October 17, 2010

Pretzels


This recipe was clearly a measure of my devotion to this project. First, I not a big fan of pretzels. I don't dislike them, but I wouldn't go out of my way to eat one. Next, the whole lye soak was a royal pain. I had to track down and order food grade lye. I used "High Grade Sodium Hydroxide Lye Micro Beads" from Essential Depot (via Amazon.com). These were $5 plus another $12 shipping. Add to that gloves and safety glasses to the total cost.

The dough was beautify, smooth and silky. Shaping wasn't a problem, but I found it much easier and quicker to twist them on the counter rather than trying to spin them. This seem a natural extension of rolling them out.

Dipping was another problem. I first tried a stainless pot with a pasta insert. Unfortunately, the pretzels stuck to the insert. I ended up using a slotted spoon doing the pretzels one at a time. Annoying, but with a dozen pretzels this isn't to bad. (Certainly, not a bakeshop techinque.) Next, I baked the pretzels on a baking stone only to discover that they bonded to the stone and had to be scraped off.

Actually, I made three sets of pretzels as can be seen from the picture. (Yes, I forgot to slash the prezels.) The one to the left is the lye soaked pretzel. For the one in the middle, I used a technique from Reinhart's lastest book. I soaked the pretzels in a solution of 8 tsp of baking soda and 2 cups of warm water. The pretzels on the right weren't soaked but had an egg glaze.

The lye soaked prezels were somewhat unevenly colored, but were much darker. The egg glaze, as you can see, gave the least color. I really didn't expect any real difference in flavor, just appearance. Although the difference was slight, there was a noticable difference. For fresh pretzels, I prefered the lye soaked pretzels. For day old pretzels (not nearly as good), I liked these least.

As pretzel go, these were quite good. But I'll stick to bagels or bialys.

Roasted Potato Breads


For this challenge, I made the original Potato Bread recipe and both of the variations, Rosemary Herb Bread and Roasted Garlic Bread. For the roast potatoes, I peeled russet potatoes, sliced them about 1 inch thick, tossed them in olive oil, salted and peppered them, and then baked them at 425 degrees until knife tender, about 30 minutes. I broke the potatoes into pieces, but did not mash them. The finshed dough had obvious chunks of potatoes in them, but these chunks were absent in the finished bread. For all three breads, I made fendu-style loaves. For all the loaves, I found Hamelman's recommendations of 40 minutes to be too long. Around thirty minutes seemed adequate.

For the Herb bread, I used closer to two grams of rosemary (per loaf) rather than three. This was sufficient. For the garlic bread, I used nine grams of roasted garlic, about three cloves. For these last two loaves, I upped the whole-wheat content slightly (to about 30%) to good effect.

These were all excellent, somewhat rustic breads. Shelf life was a bit on the short side, but okay.

Sunday, October 3, 2010

Challah


ALERT: The yeast calculation in this post is incorrect in tha tit doesn't account for the switch to instant dried yeast. See later post on yeast.

I've only made one pass through this recipe, so I'll update this entry once I've had a chance to go back and make the bread again. But I wanted to get a few things down while they were still fresh in my mind.

First, it appears the home recipe is off on the amount of yeast by a factor of three. The recipe calls for 3% yeast, and the numbers for US and Metric are consistent with this percentage. The home recipe uses 32 ounces of flour but only calls for 0.32 ounces of yeast (1%). In making the bread I used three times this amount and got a reasonable rise time. Again, this is a very rich dough, which is typically hard on yeast so the amount is not unusual.

The dough is quite stiff. I made the full recipe which was okay but a bit of a strain for my aging KitchenAid mixer. Since I've made Challah many times before, I elected to play with some of the braiding techniques in Chapter 9. I made the Six-point Star using the Method I for the six-strand braid and I made the Winston Knot.

I was a little annoyed by the lack of measurements for some of the braids (including the Winston Knot) and wish Hamelman had included recommend weights and lengths with each recipe. Still, the braiding went well. On the star, I made the rosette a bit too large and had a couple of star points that wanted to pull apart. And, with the Winston Knot, I didn't get the nice square knot shown in the drawing in the book. Nonetheless, I still got a reasonable looking bread.

The bread had a nice flavor but was a bit on the dry side. At the Artisian Bread Festival in Asheville last year, Reinhart mentioned that he had eliminate the egg-whites from his Challah because they have a drying effect. (And his latest Challah is the best I've had.) Next time around, I'll try this.

More to come...

Soft Butter Rolls


I made this recipe three times. The first time around, I made the rolls, little cloverleaf rolls, and the braids. The second time I made the hamburger rolls. The last time around, I made the cinnamon-raisin bread.

All three batches had a very nice flavor. At 1.33-ounces, I found the rolls a little on the small side but acceptable. It was noted on the Mellow Baker's site that the yeast measurements in the recipe are too low. If fact, they are off by a factor of 10. Although warned the measurements were off, I didn't correct adequately. Enriched breads need a lot of added yeast, and I didn't add enough so I got very slow rise-times. The bread will still work without the correction, but be patient.

For the hamburger rolls, I increased the size. Hamelman specifies 2.25-ounce pieces. Looking in other books, I found Reinhart uses 3.0-ounce pieces and Hitz uses 3.2 to 3.4-ounce pieces. I went with the larger sizes and was happy I did.

Finally, I made the cinnamon-raisin bread, again using too little yeast. Again, the flavor was great but the rise was poor and the rise-times were extended. Hamelman doesn't give measurements for the cinnamon sugar or the amount of raisins to use. I used about 3/4 cups of raisins, 2 Tbs butter, and 2 Tbs cinnamon-sugar per loaf. This seemed to work well. Overall, these were good loaves, but I'll stick to Reinharts spectacularly good loaves in the future.

Sunday, September 19, 2010

Cheese Bread


Hamelman's recipe for Cheese Bread produces a lovely, crackly, soft white cheese bread with loads of flavor. This is definitely a keeper.

The first time through I followed the recipe for boules, pretty much, as it was written. I did make one change. In forming the loaf, I first mixed in the grated cheese in the mixer as directed. But then I flatten the dough, placed the cubes on top and rolled the dough up. My goal was to get an even distribution of the chunks and to avoid having exposed cheese. This approach worked quite well. I am very pleased with Hamelman's recipe.

Still, I wanted to see just how versatile (or forgiving) the recipe is. So when I went back to make the recipe a second time, I altered the the recipe is several ways.

First, I decided that to see if the recipe would work with as a transitional loaf so I replaced some of the bread flour (32%) with whole-wheat flour. Next, while I used parmesan as the grated cheese, I used Jarleberg for the chunks, cut roughly 1 inch by 1 inch by 1/4 inch. I folded in the chucks as before. Finally, I made a loaf-bread with the recipe. Since I was baking the bread in a dark (Chicago Metallic) pan, I reduced the temperature. I found the bread did very nicely with 15 minutes at 435 degrees followed by 20 minutes at 400 degrees. As you can see from the picture, if a piece of cheese pokes through, this give a ugly blister, but rolling the dough largely avoids this problem.

Overall, I like the altered recipe even better. I thought the combination of cheeses less biting, I liked the whole-wheat, and, for me at least, loaf bread is generally more useful than boules.

Another great bread!

Sunday, September 12, 2010

Rye with Walnuts


Yet another rye. This one took two tries, but I was able to produce something that was worth eating—not a favorite, not something I'm likely to make again anytime soon, but something that I didn't try once and immediately discard. That the second loaf, the first quickly went into the trash.

After the first loaf, I was ready to give on on this one. But it seems that is always the case with Hamelman's ryes, at least for me. Yet other folks don't seem to be having these problems, so I felt it was time to go back and try again looking more closely at what I was doing.

In the course of making this bread, I made several changes the second time around. First, I've found the ryes recipes to produce very sticky doughs that wanted to puddle in the bottom of the mixer bowl rather than be kneaded. I've tried to deal with this before, but this time I was very careful. I repeatedly stopped the mixer, massed the dough together, and dusted it with flour to give it a dryer, less sticky exterior. As I kneaded the dough, I stood over the mixer and very lightly dusted the sides of the bowl with flour to insure the dough was not sticking to the bowl. Once the dough had kneaded the full amount of time, I took it out and gave it another couple of quick folds.

The next major changes were the fermentation times. In most of Hamelman's recipes, times have been very accurate. While the conditions in my kitchen weren't changing, when making this rye, I found the times totally unreliable. I had to extend both the bulk and final fermentations, particularly the latter going totally by the feel of the dough.

Admittedly, these are changes that I should have been doing all along. But I haven't needed them with the other recipes, so I was disinclined to try them with the rye recipes. Next time I'll know better.

The second loaf, made with these changes was reasonable. It was still a bit heavy and the rye flavor, despite the walnuts, was still too strong for my taste. But toasted, it worked well with peanut butter or cheese. I'm still not a big fan of rye, but this was a step in the right direction.

Thursday, August 12, 2010

40 Percent Caraway Rye


To round out the August breads, we have another rye recipe, number four of 15. As I've said before, I'm not a fan of rye breads. The good news is that this is a 40% rye—a transitional rye rather than one of the heavier ryes.

For my first pass at this recipe, I simply halved the original recipe an made an oblong loaf. Halving the recipe is pretty much as low as you can go. The recipe yields a moist dough that can puddle in the bottom of the mixer and resist kneading. I had to stop the mixer a couple of times, scrape the bowl, and lightly dust it with flower. Any less dough and this would have been a real problem.

This is truly a caraway rye. Caraway was the dominant taste, a taste that in large part obscured everything else. To be fair, in my experience, caraway seeds quickly lose their flavor. The caraway seeds I used were purchased recently. Perhaps, the recipe is designed for cooks using less potent caraway seeds. This was certainly an acceptable loaf, but I'd strongly suggest cutting back on the caraway seeds unless you have a real passion for caraway.

Hamelman suggests a couple of variations, so I simply followed his suggestions for my second pass at this recipe. I made both 3 oz. rolls and 3 oz. Salzstangerl or salt sticks. Basically, Salzstangerl are fat bread sticks that have been pressed into a mixture of coarse salt and caraway seeds.

For both the rolls and the Salzstangerl, I omitted the caraway seeds from the dough. With the rolls, I wanted to see what the bread tasted like without the overpowering caraway. And the answer? This is a very pleasant mild rye bread, something I could easily become used to. With the Salzstangerl, I figured that the caraway coating would be adequate. In fact, I made these with just salt and with a mixture of both salt and caraway. Both were pleasant. Since it is easy to do both, that would be my suggestion.

This isn't a bad recipe, but I don't plan to make it again anytime soon—even if I didn't have another 11 rye recipes from Hamelman to look forward to.

Five-Grain Bread


The five grains in this bread come from high-gluten and whole-wheat flour, rye flour, cornmeal, rolled oats, and flax seeds. Since it can be argued that flax seeds aren't really a grain, the name may not be totally accurate. Nonetheless, this is still a terrific bread. It has a lovely, complex flavor without being too heavy. The crust, in particular, has a nice toasted nutty flavor.

For these loaves, Hammelman suggest either a two-hour bulk fermentation or an overnight retarding. I tried both scheduling my baking so that I could compare these loaves. The loaf on the left (overnight retarding) was started the day before the loaf on the right (two-hour bulk fermentation). Both loaves were baked in a soaked cloche. I preheated the cloche before putting the bread into it, cooking first the overnight retarded loaf and then the two-hour bulk fermentation loaf. Consequently, baking conditions were not identical but were close. (I did not cool and resoak the cloche.) I set the retarded loaf out for an hour or so before baking, but it wasn't up to room temperature.

Differences between loaves were slight. I got slightly more oven spring and a slightly softer crumb with the two-hour fermentation. Overall, there was little difference in the taste of the loaves. I slightly preferred the retarded loaf, but probably wouldn't have been able to distinguish between the two loaves if I hadn't had them side-by-side. Both were excellent and well worth the effort, not that either was difficult to make. This is a keeper.

Baguettes with Poolish and Pâte Fermentée


Yes, I haven't posted in a while. I finished the July breads in the middle of the month so there was a week or so when I didn't have the next set of recipes. Then I was out of town for another week. But mostly I've been baking without writing. So it is time to catch up!

I begin with two new baguettes recipes. These recipes are quite similar, so I cover both in this post. They differing only in the preferment—one using a poolish (a wet preferment with a batter-like consistency) and the other a pâte fermentée (a dryer preferment with the same consistency as the final dough). Both produced a lovely dough and a bread very similar to straight dough
French Bread previously described on this blog. Neither bread has good keeping qualities. They are usable the second day, but that's about the limit. This is about the same or slightly better than the French Bread. (Hint: You can take stale bread, rub it with water, wrap it in foil, and then reheat it in a low oven. This will soften the bread, but you will need to use it quickly.)

Compared to the pâte fermentée, the poolish produced a dough that was slightly more elastic, slightly less extensible, gave a slightly better rise, seemed a bit sweeter and less sour, and had a slightly more open crumb. But I hesitate to mention these differences because all these differences were quite, quite small. Had I not had the breads side-by-side, the differences would not have been noticeable. For a practical considerations, the breads were the same.

The recipe produced a nice, satiny dough that was fun to play with. This inspired me to play around with different shapes. Using ideas from Peter Reinhart's books, Ciril Hitz's videos, and Lionel Vatinet's presentation at the Asheville Artisian Bread Festival, I made baguettes, a couple of baguette variants, an epi, a variation on an epi, and a corrone de bordoulaise. Previously, I'd made baguettes and epis, but little else. All of these variations proved easy and fun, definitely something I'd do again.

Monday, July 19, 2010

French Bread


Flour (100%), water (70%), yeast (1.25%) and salt (1.8%)—this is a pretty basic recipe for a French baguettes. It is a simple straight dough. There are no special techniques—no preferement and no autolyses. The bread is easily made in under one day. This is a type of bread that I've made hundreds of times.

There were no surprises with this bread. The results were excellent. This particular recipe doesn't quite develop the flavor that can be achieved with a preferment. But the bread is considerably less trouble. It won't keep very well, but that's rarely an issue since you're apt to inhale this bread.

This recipe produces a soft, satiny dough that is easy to work with, and easy to adapt. I've use it to make both baguettes and large rolls. The recipe for four baguettes will give 16 hamburger size rolls. These take about 12-15 minutes to cook. Or you can mix and match making some baguettes and some rolls.
I won't pretend that there aren't better recipes for French style bread, but none provide better quality with less work.

70% & 80% Sourdough Ryes With Soakers


In the spirit of full disclosure, rye breads have never been among my favorites. At times I can appreciate a lighter rye bread, particularly rye toast with a good crunchy peanut butter. And rye goes well in some heavier sandwiches, pastrami for example. But, rye is rarely my first choice, and when I do choose rye, it is always a light rye. Moreover, Hamelman's comments leads one to expect a heavy, leaden bread. Breads with a rye content beyond 60 percent, says Hamelman, "should be sliced thinly... sandwiches made with these breads are open face, since a double thickness of these compact and concentrated breads can be a bit too much of a workout for the jaw." (Emphasis added.) These are not encouraging words.

Finding the ingredients for these two breads was also a challenge. The 80% loaf calls for whole-rye flour and high-gluten flour. The 70% loaf calls for medium rye flour and rye chops. Whole-rye flour is fairly easy to come by at most grocery stores, but the other three ingredients are not so easily found. I had already faced the problem of medium rye flour and high-gluten flour from the Light Rye recipe. I order medium rye flour from King Arthur's. Although I gotten high-gluten flour from King Arthur's in the past, I'm now blending my own using King Arthur's bread flour and vital wheat gluten. For rye chops, I went to the Internet and ordered rye berries. I put the rye berries in a food processor to create the chops. On the whole, these were quite hard and this did not work very well. (Perhaps it would have worked better if I'd tried processing them after soaking. Alas, I didn't try this.)

(The baker's percentages were a little puzzling with the recipe with rye chops. Had I been doing the calculation, I'm not sure whether I would have included these as part of the flour or not. Hamelman included them. Conseqently, both recipes had a 78% hydration. An to be sure, the rye chops do soak up quite a bit of water. Still, if I were to eliminate the rye chops from the recipe, they don't add much and are a pain to find and work with, I'm not quite sure how I would proceed.)

When preparing the bread, I cut each of the recipes in half. My wife likes rye even less than I so most of the two smaller loaves would be discarded. Unfortunately, when cut in half, I didn't have quite enough dough for my mixer and needed to do the final mix by hand. Both recipes produced a wet dough without much gluten development.

The 80% loaf called for an oblong, free from loaf while the 70% loaf called for a pullman pan. Since I was only making half the recipe, I didn't have enough dough to fill my pullman pan. Consequently, I cooked both loaves together, one in each end of the pullman pan using the temperatures and times for the 70% loaf. (Times and temperatuers for the two loaves were pretty much the same anyway.) For the final fermentation, I separated the two loaves in the pan with a piece of cardboard covered in plastic wrap which I removed before baking. This approach worked nicely giving me two small, nearly identical loaves.

The two loaves are shown above with the 70% loaf on the left. At least initially, the 80% loaf had the stronger rye taste, but the 70% loaf had a very strong rye finish. Perhaps this is a consequence of the rye chops which need to be chewed before their flavor is released. The chops also gave the 70% loaf a chewier texture. Both loaves had an unpleasantly hard crust and a dense crumb. Overall, the loaves were more alike than different.

The bottom line is that I can't say I was particularly enthusiastic about either of these two breads. Thus far, before posting any results, I have tried each recipe at least twice, trying at least once to follow the recipe very closely. This time I've only made each recipe once, and am not include to go back and try either recipe again, particularly since there are another 15 rye recipes in the book.

Tuesday, July 13, 2010

Bialys


I'm a big fan of bialys so I was particularly interested to try Hamelman's recipe. I first encountered bialys over a decade ago in Baking with Julia which includes a recipe from Lauren Groveman. More recently, I've pretty much stuck to the recipe in Rose Levy Beranbaum Bread Bible athough I have tried a few other recipes including the recipe in Mimi Sheraton's unreadable The Bialy Eaters.

Excluding toppings, Hamelman takes an approach that pretty much matches everyone else. With exception of the malt he adds to bagels, Hamelman pretty much uses the same dough for bialys. (And malt is sometimes added to bialys.) In particular, both recipes call for 58% hydration. By comparison, Ciril Hitz treats bialys as a bagel variation (with 59.4% hydration) in Baking Artisan Breads. By contrast, Beranbaum has two different recipes with 68.6% hydration for bialys and 63.8% for bagels. Reinhart hasn't published a bialy recipe, but he uses 57.1% hydration for the bagels in The Bread Baker's Apprentice. The Child/Groveman recipe isn't specific enough to calculate hydration. But it does differ from the other recipes in that it incorporates onions directly into the dough as well as in the topping.

Although I didn't test the side-by-side, as far as the bread goes, the recipes all produce very similar products. Most bialys are flatter than those I made using Hamelman's recipe, but that didn't seem to affect the taste. Without a side-by-side comparison, I wouldn't recommend one recipe over another.

The big difference between Hamelman recipe and most other recipes is the treatment of the onions for the topping. Hamelman grinds raw onions, mixes them with bread crumbs, and then lets them rest in the refrigerator for a couple of hours. Since this is the same approach that Mimi Sheraton recommends in The Bialy Eaters, I'm guessing that this is an authentic approach. But when I made bialys this way, I found the results were awful. I ended up cutting the part with the onions off, discarding it, and just eating the rest. An Hamelman's variation with the addition of chopped garlic wasn't any better.

Every other recipe that I've seen calls for sauteing the onions first, something I've always done and highly recommend. I particularly like red onions sauteed in peanut oil. The addition of poppy seeds and sesame seeds is another plus.

All-in-all, I'll probably stick to Beranbaum because it's what I'm comfortable with, but I'd be happy with any of these recipes. However, for me, cooking the onions is a must. I don't plan to go back to the onions and breadcrumbs anytime soon.

Tuesday, July 6, 2010

Beer Bread with Roasted Barley


This is another annoying recipe that requires an ingredient that is hard to locate, a problem that is becoming all to common with this challenge. First high-gluten flour, then high-extraction flour, and now, malted barley. (And one of next month's recipes calls for rye chops!) I really don't mind using unusual ingredients, but at times Hamelman doesn't provide an adequate description of said ingredients, guidance in finding the ingredients, or possible substitutions.

For my first pass through the recipe, I hadn't yet located malted barley so I substituted barley flour while I continued my search. This produce a nice, but unremarkable loaf. An okay loaf, but nothing memorable.

For the malted barley, the idea is to take hulled barley that can still be sprouted, sprout it, toast it briefly in the oven, and then grind it into a fairly fine meal to use in the bread. Eventually, I found barley that was suitable for sprouting although perhaps not completely hulled, and repeated the bread.

For comparison purposes, I actually made four half-loaves. I use the sprouted/toasted/ground barley per the original recipe, I use ground pearl barley, I used barley flour, and, as a lark, diastatic malt powder. These four loaves are shown in the picture. (Different slash patterns are used so I can distinguish the breads after baking.) Otherwise, I stuck pretty much to the recipe. For the record, I used Guinness as the beer.

Overall, all four breads were pleasant and enjoyable but, as before, unremarkable. The differences among the loaves were slight. The beer didn't really seem to add much to the bread. Perhaps, rather than using the watery Guinness, a stronger, more assertive beer would have been a better choice. Of the four loaves, my wife and I both preferred, surprisingly, the bread made with the diastatic malt powder. And we both ranked the sprouted barley last. It certainly wasn't worth the effort of tracking down the barley. We split on the other two loaves.

All-in-all this isn't a loaf that I'm inclined to go back to. On the other hand, I do have a lot of hulled barley, barley flour and the like.

Monday, June 28, 2010

Bagels


I love a good bagel and have been baking them for several years using recipes from Peter Reinhart. So I was very interested to see what twists Hamelman might come up with. Is there something else I could be doing to bake an even better bagel? There are several key differences in the recipes, including the use of a bagel board. It all seemed very interesting.

Using Hamelman's recipe, I've now made bagels three times. The first try, I follow the recipe very closely using King Arthur's high gluten flour. I faked the bagel boards using a fresh cedar plank I had bought for the grill along with a linen dish towel. (The approach worked well except the kitchen smelled of pencil shavings.) The bagels were very nice but a bit gnarly looking. When boiled, they were slow to float and didn't rise or round out very nicely. Flavor, however, was not a problem. They tasted great.

The first batch exhausted my supply of high gluten flour. For the second and third batches, I had to adjust. For the second batch, I created my own high gluten flour by adding vital wheat gluten to bread flour. (See my previous post, Tech. Note: High-gluten Flour & Vital Wheat Gluten, for the detail on using vital wheat gluten.) For my third batch, which I cooked at the same time as the second batch, I used straight bread flour without adding any vital wheat gluten. I wanted to see if it really made a difference. Also, after shaping, I let the later batches sit out on the counter for another 20 to 30 minutes, that is, until that passed Reinhart's bagel floating test, before I put them into the refrigerator overnight. I was hoping the bagels would be a little less gnarly. Finally, I baked these directly on a baking stone rather than bothering with the bagel board, something I found to be a real nuisance.

The picture above shows my later efforts. I didn't taste bagels made with high gluten flour side-by-side with those made with bread flour with added vital wheat gluten, but as memory serves me, I don't think there was much difference. There was, however, a striking difference between those made with just bread flour and those that had the added gluten. It is definitely worth the very minor effort need to add the vital wheat gluten. The bagel without the addition were more bread-like lacking the chewiness I've come to expect of bagels. This was not a problem with the bagels with the added vital wheat gluten. I won't be in any hurry to order more high gluten flour.

Also, waiting until the bagel passed the float test proved to be a good idea. I got fuller looking bagels that quickly floated when boiled. And as to the bagel board, once was enough. Cooking directly on a baking stone worked just fine. Overall, these were fine bagels and not that different from Reinhart's. Still, in the future, I probably go back to Reinhart's recipe, if only because it is what I'm used to.

Friday, June 18, 2010

Tech. Note: High Extraction Flour

The recipe for Miche calls for high-extraction flour. From looking around the Internet and in some of my bread books, there appears to be some confusion about just what high-extraction flour is and how you can come by it (or fake it). So it seems worthwhile to describe what I've been able to piece together.

First, recall that a kernel is composed of three parts: indigestible outer coating or bran; the embryo or germ, the part that will develop into a plant; and the food for the developing plant or endosperm. With bread flour the germ and bran are removed leaving just the endosperm. With whole wheat flour, the germ and bran are also included in the flour.

Extraction is a measure of how much flour is extracted or milled from a given amount of wheat, i.e., how much flour is left after remove bran and germ. If you start with 100 pounds of wheat and end up with 70 pounds of flour, then you have an extraction rate of 70%. With whole-wheat flour, the entire wheat kernel is used so 100 pounds of wheat yield 100 pounds of flour and you have an extraction rate of 100%. With typical bread flour, the extraction rate is much lower, in the neighborhood of 70% to 75%. High-extraction flour lies somewhere between bread flour and whole-wheat flour. That is, more (but not all) of the bran and germ included in the flour. You can think of whole-wheat flour as the highest-extraction flour. Since high-extraction flour lies between whole-wheat and bread flour, its baking properties lie between the baking properties of whole-wheat and bread flour.

Since high extraction flour can be difficult to locate, home bakers typically simulate it. There are two approaches. First, you can take coarse or medium ground whole-wheat flour and put it through a sieve to remove some to the larger pieces of bran in the flour. If you start with 100 grams of flour and you "extract " or sieve out 10 grams of bran, then you are left with flour with a 90% extraction. It may seem odd that you are removing or "extracting" bran to get high-extraction flour, but you can think of it as going from "highest-extraction" flour to "high-extraction" flour. (I suspect this double use of "extraction" is a major part of the confusion.) You'll need to weight the flour before and after to determine the extraction rate. The extraction fraction is just the weight of the flour left divided by the weight of the flour you stared with.

Unfortunately, unless you have a whole range of different sieves, you won't have a lot of control over the extraction rate. Also, you'll need to use coarse or medium ground whole wheat flour, or everything will likely pass straight through your sieve.
Working with King Arthur Organic Whole Wheat flour and using two different sieves, I was only able to remove about 4% of the bran.

A second, simpler approach is to simply combine bread flour and whole-wheat flour. This is much easier to do, but, unfortunately, calculating the quantities needed can be more complicated. Using the definition of extraction, I worked out the following formulas to calculate flour quantities. If

Q = quantity of flour desired
R1 = desired extraction rate (average high extraction rate)
R2 = given extraction rate (for bread flour)
W = amount of whole-wheat flour to use (100% extraction)
B = amount of bread flour to use (R2 extraction)

then

B = Q (R2 -R1R2)/(R1 - R1R2), and,
W = Q (R1-R2)/(R1-R1R2)

For example, if you want 100 grams at 85% extraction and you have 70% extraction bread flour, then

B = 100 * (0.7 -0.85*0.7) / (0.85 -0.85*0 .7) = 41 grams, and,
W = 100 * (0.85-0.7) / (0.85*0.7-0.85) = 59 grams.

This is the approach I used with my second go at the miche and it worked great!
_____________________________

(There remainder of this post can be safely skipped by most readers. At this point I explain how I arrived at these equations. But, if you are so inclined, please read on and let me know if you see any problems.)

So, if you are interested, here is my reasoning:

First, a little background. Lets assume you want high-extraction flour with a 90% extraction weight and you are starting whole wheat flour and bread flour with a 70% extraction rate. If you have 100 grams of bread flour, that was what was left when 100/0.7 = 142.86 grams of flour was extracted. To get a 90% extraction rate, you will want to add enough whole-wheat flour so that the ratio of the total flour you have is 90% of the whole wheat flour plus the weight of the original flour that was extracted. If x represent the added whole-wheat flour, you'll need to satisfy the equation:

(100 + x) / (142.86 + x) = 0.90

That is, you'll need to add 285.71 grams of flour given a total of 385.71. In general, you can take the amount of flour you'll want and multiply it by 100/385.71 = 0.259 to get the amount of bread flour you'll need and multiply it by 285.71/385.71 = 0.741 to get the amount of whole-wheat flour you'll need.

Generalizing, let Q be the quantity of flour you desire, R1 is the extraction rate you desire, R2 is the extraction rate you have, W the amount of whole-wheat flour you will use, and B the amount of bread flour you will use. First, clearly the total amount of flour is just the sum of the whole-wheat and bread flour: Q = W + B

Next, the total amount of flour I would have started with before removing the bran/germ would be Q/R1, or, W + (B/R2). In the first case, we are averaging the removal over both flours, i.e., finding the effective extraction. In the second case, we are calculating the removal based on the actual bread flour used. Think of it this way---starting with a fixed amount of whole-wheat flour, we could sieve all the flour, case 1, or we could separate out part of the wheat flour, sieve the remaining wheat flour, and then add the removed flour back, case 2. Since these are equivalent, we can write: Q/R1 = W + (B/R2).

Its all downhill from here. Substituting (Q-B) for W and solving for B gives the first formula. Substituting (Q-W) for B and solving for W gives the second formula.


Thursday, June 17, 2010

Miche, Point-a-Calliere


It has been my stated intention to try every recipe at least twice, but after doing this loaf the first time I was full prepared to renig on that promise. This recipe does makes a large, spectacular loaf with the dough weighing in at over three and a half pounds. But my first result was a heavy, chewy, extremely sour loaf that cooked unevenly. Admittedly, most of these are flaws that I should have been able to address and overcome. But I felt the sourness was characteristic of the bread, i.e., something that I'd gotten right, that was intended by the recipe, and that I really didn't like.

Having made the decision to stop at one try, I began writing up my results. One reoccurring annoyance with Hamelman is that he calls for unusual ingredients but doesn't provide adquate guidance in obtaining these ingredients. The descriptions can be sketchy and there is no list of sources in the book. In particular, this recipe calls for high-extraction whole-wheat flour.

I looked back over Hamelman to see what I could say about high-extraction flour and realized that I really didn't have a handle on this. After turning to my library and to the Internet, I began to realize that this was part of my problem. Hamelman states that if high-extraction whole-wheat flour isn't available, use a blend of 85 to 90% whole-wheat flour and bread flour for the remainder. For the first loaf, I used a ratio of 12 grams white flour to 88 grams of whole-wheat flour, i.e., 88% whole-wheat and 12% bread flour. Once I had a better understanding, I was able to calculate the actual extraction-rate for my loaf. Assuming bread flour is 75% extraction, that actually works out to be 96% extraction. This is virtually a whole-wheat loaf. This brings me to another of my personal preferences. I've quite enjoyed the transitional whole-wheat breads I've made, but I'm not that big on 100% whole-wheat.

Hamelman doesn't say what extraction he uses or recommends but does mention that he uses a high-extraction flour with a 0.92% ash content. Pyler gives a table of ash content vs. extraction and from this I extrapolated an extraction-rate of 84% for Hamelman's flour.
With this in mind, I went back and recalculated my flour ratios. Assuming 75% extraction for my bread flour, I worked out conversion factors for an 85% high-extraction flour: 46.4% whole-wheat and 53.6% bread flour. I also decided to increase the initial mixing time to three minutes and use three folds with a goal of shortening the fermentation time to reduce the acidity. Overall, I cut the final fermentation by around 45 minute to an hour.

The results were a total reversal. I produced a wonderful loaf that I love. Not at all dense, it was only mildly acidic. The loaf wasn't perfect, but it was greatly improved and is now one of my favorites. It is definitely worth going back to and trying to perfect.

Tuesday, June 15, 2010

Light Rye Bread


In general, rye bread is not one of my favorites. It can turn out heavy or gummy. It is fairly easy to overwork. Still, a light, well made rye is a joy. I particularly like rye toast spread with crunchy peanut butter. So Hamelman's promise of a "Light" Rye Bread was tempting.

The first hurdle, however was flour. The recipe calls for high-gluten flour and I'd used up the last that I had. So, as described in the previous post, I mixed my own. Aside from this, I stuck very close to the recipe sprinkling the bread with caraway seeds after misting the top. I was rewarded with a wonderful light rye bread.

The second time around, I decided to try using a loaf pan. I also omitted the caraway seeds. The results were acceptable, but not spectacular. The loaf did not rise as well an was a little dense. Apart from the pan, it doesn't seem that I did anything different. Perhaps this is just a temperamental loaf. But I certainly won't use a loaf pan again.

Tech. Note: High-gluten Flour & Vital Wheat Gluten

Thus far, two of the recipes have called for high-gluten flour---the Light Rye Bread and the Bagels. Neither is a surprise. Since rye has less gluten, a high-gluten flour often added to "make up the difference", so to speak. Bagels need the added gluten to help provide the added chewiness.

At this point, I've only made the Hamelman bagels once. I'll add a post once I've had an opportunity to revisit them. I've made the rye twice and will post on it in the next day or so. With the bagels, I used up the last of the high-gluten flour I had. This is something I can't find locally and have yet ordered any more. So with the rye bread, I've had to "mix" my own high-gluten flour using bread flour and vital wheat gluten, both items readily available locally. This seems to have worked well, so I thought I'd describe the calculation I made. (I plan to use this technique when I revisit the bagels. I'll post my results when I do.)

For those of you who might not be familiar with it, Baking Science & Technology by the late E.J.Pyler is often cited as the definitive book on the science of bread. A couple of years ago Sosland Publishing enlisted L.A.Gorton to bring out a fourth edition of the book. This is a massive two volume work. I only have the first volume (772 pages) which set me back $165.

Pyler provides a table for raising the gluten level in flour through the addition of vital wheat gluten. The table has a row for starting protein levels from 6% to 16%. It has a column for target levels from 7% to 17%. Each entry in the table give the amount by weight of vital wheat gluten that needs to be added to raise the protein content to the target level. I used this table to determine how much vital wheat gluten to add. (I'm tacitly assuming that all vital wheat gluten is the same, or, at least, that the vital wheat gluten I have is typical.)

For my starting point, I'm using King Arthur Bread Flour with a protein content of 12.7%. For my target, I'm using King Arthur High-gluten Flour which has a protein content of 14.2%, or a net increase of 1.5%. The nearest table entry in Pyler says to add 1.49 to increase from 13% to 14%. So, extrapolating, an addition of 1.5 x 1.49 = 2.235 is needed. (Pyler uses pounds but I see no reason why units matter as long as measurements are done consistently.) In other words, to go from bread flour to high-gluten flour, add 2.235 grams of vital wheat gluten to ever 100 grams of bread flour you are using.

Extrapolating a bit further, since 100 of every 102.235 grams of the mix is bread flour, you'll multiple the amount of high-gluten flour called for by 0.978 to determine the amount of bread flour to use. Since 2.235 grams of every 102.235 grams of the mix is vital wheat gluten, multiple the amount of high-gluten flour called for by 0.0219 to determine the amount of vital wheat gluten to use.

For example, the Light Rye Bread calls for 1 lb, 11.2 oz or 772 grams of high-gluten flour. I would use 772 x 0.978 = 755 grams of bread flour and 772 x 0.0219 = 17 grams of vital wheat gluten. These are the weights I used when making the rye bread and they seemed to work fine.

Monday, June 14, 2010

Vermont Sourdough Breads


"One" of the June breads in the Hamelman Challenge is Vermont Sourdough. Actually, there are three recipes: Vermont Sourdough, Vermont Sourdough with Whole Wheat, and Vermont Sourdough with Increased Whole Grain. Basically these are the same recipe except the first is 10% rye, the second is 10% whole wheat, and the third is 15% rye. So, is this three recipes or one?

When listed in the Challenge, they were given separate number as though separate recipes. But if separate, then we have five new breads for June rather than the usual three. In the spirit of the Mellow Bakers, it is up to the baker to decide how to count these.

In fact, these recipes immediately suggest even more variations. For example, per the recipe, the final fermentation can be 2, 8, or 18 hours---it's the baker choice. There is also some ambiguity about what flour to use. The recipes specify bread flour. The text preceding the recipes specifically call for 11.5% to 12% bread flour. King Arthur's All Purpose Flour is 11.7%. King Arthur's Bread Flour is 12.7%. It would seem AP flour would be the logical choice based on percentage of protein. (Of course, this raise a whole lot of questions about the other recipes in the book.)

For this project, I elected to bake five types of bread. I made each of the three recipes using KA AP Flour and the overnight refrigerator retard. Additional, I made the first recipe with KA AP Four with a 2 hour fermentation and with KA Bread Flour with an 2 hour fermentation. With the overnight retard, I went directly from the refrigerator to the oven as suggested by Hamelman. Apart from these variations, I pretty much stuck to the book.

In general, there really wasn't a lot of difference among the three recipes. I had a slight preference for the wholewheat, but I would be happy with any of the three. As promised by Hamelman, the overnight retard help to develop the sour taste more. But, in the interest of full disclosure, I'm not really a sourdough fan. So, based on taste, I preferred the shorter fermentation. Moreover, I found that the dough baked directly from the refrigerator did not produce the save volume of bread, as the dough with the that had the shorter fermentation, i.e., did not have the same oven spring. So I preferred the texture of the bread with the shorter fermentation time as well. And since it takes a day less to make, for me, it won hands down.

As to bread flour vs. all purpose flour, either seemed to work well. I was careful to weight flour and water without making any adjustments. Not surprisingly, the dough from the AP flour seemed a little wetter, but not by much. And the crumb seemed a bit more open. In the photo, the slice at the bottom of the picture is 24 hour retard AP four, the middle slice is 2 hour retard AP flour, and the bread at the top of the picture is 2 hour retard bread flour.

While I don't lament having made this/these recipe/recipes, I think I'll stick to Hamelman's Rustic Bread recipe.

Tuesday, June 8, 2010

Rustic Bread


Hot Cross Buns was the first recipe selected in the Hamelman Challenge and was largely a trial run. The next official recipe was the Rustic Bread. It along with Bagels and Rye filled out the first full month of recipes.

As a place to start, the Rustic Bread was an inspired choice. This is definitely a solid recipe and a practical place to begin. The inclusion of 10% rye and 10% whole wheat gives a bread that is neither a wimpy white bread nor an heavy, stogy whole grain bread. The use of a pre-ferment, rye, and whole wheat build a satisfyingly complex flavor. 60% hydration gave a loaf that had a more open crumb, but that will still relatively tight and useful as a sandwich bread. While I love ciabatta, it is not the most practical bread for a sandwich with a leaky filling. This bread would work fine. The only down side to the bread is the boules I’ve made have been a little too flat. This is something I don’t fully understand, but need to work on.

I’ve made the recipe three times now and definitely plan to continue making it. The first time through, I stuck closely to the original recipe. I used 10 rather than 9.6 oz of water and still had a shaggy pre-ferment. The only other problem I encountered was the pre-ferment did not completely mix into the dough on my first try. This gave a bread with a slightly marbled appearance. Otherwise, the bread was fine and the problem was easy to correct in subsequent loaves. I simply added the pre-ferment to the mixer in smaller pieces and a bit earlier.

The second and third tries I played around with the cooking methods. The second time around I made one boule using a cloche lid over the bread. (I soaked the lid and then preheated it along with the pizza stone starting in a cold oven.) With a 1½ pound loaf, the boule had too much oven spring. It expanded all the way to the cloche and stuck to it. Still, I got a great crust this way and a really good oven spring. With the third try, I tried a 1 pound loaf with the cloche and this worked nicely. Still, I was right to the limit of the capacity of my cloche. I’ve also used some of the dough to make smaller rolls decreasing the cooking time. This worked very nicely.

Cornbread

Cornbread, for me at least, is something of a misnomer. This is not the chemically leavened batter bread that contains more cornmeal than flour, what I normally associate with the term. Rather, it is a yeasted bread that is only 25% cornmeal. It produces a lovely golden crumb when made with yellow cornmeal and an attractive crust.

The recipe calls for fine cornmeal. On both occasions that I’ve made the bread, I’ve used Bob’s Red Mill Medium Cornmeal. This is what I happened to have on hand, and it is generally what I prefer when making traditional cornbread. Still, I really should go back and make the bread again with a fine cornmeal just to see what difference it makes. This won’t be a problem. This is a bread that I particularly like, and it is not difficult to make. This bread is definitely a favorite.

I used cornmeal directly from the freezer, so the dough was a little cooler than desired, around 72 degrees, but this didn’t seem to create any problems. Perhaps it took a bit longer to rise, but I didn’t do a comparison. The bread uses a poolish, but the poolish is made without the cornmeal. The cornmeal is soaked briefly, about 15 minutes, to soften it. It would be interesting to repeat the bread adding the cornmeal to the poolish. Peter Reinhart’s Struan, of which this bread is vaguely reminiscent, soaks the corn meal overnight (along with other grains) claiming it produces a better flavor.

I’ve made this both as a boule (shown) and in a loaf pan. In many ways the loaf bread is more practical. This is a hardy bread that works very well with sandwiches, particularly egg salad, chicken salad, or pimento cheese. The boule gave a rather flat loaf (something else to work on) that wasn’t a good shape for a sandwich. It also makes a very nice toast. I prefer a jam, blackberry for example, rather than a jelly because the textures marry well.

Yet to do? I want to repeat this using a fine cornmeal, and altering the poolish to include the cornmeal. It would also be interesting to compare the recipe to Struan.

Update (6/28/10): This weekend I repeated the recipe replacing the corn meal with corn flour making a loaf bread. This worked very nicely. The result of a very light, soft bread without the graininess of the earlier loaves, but the loaves still had a nice corn meal flavor and color. The results are show to the right.

Monday, May 31, 2010

Grissini


Sorry! I’ve never been to Turin so I don’t really know what a Grissini Torinesi or a Turin Breadstick should be like. Clearly, I’d be out of line to generalize from what I’ve sampled in the Italian-American restaurants I’ve visited.

According to Carol Fields, grissini should be “thick and irregular” with a “crunch and an earthy taste” that’s “redolent of the countryside and the old ways”. While that’s a start, in judging Hamelman recipe for grissini, what I should really do is put the issue of authenticity aside and describe the results I got. And what I got was mixed results.

The flavor was excellent. I’m munching on a bread stick even as I write. (Actually, I got one out of the freeze so I could say that.) I made the original recipe (plan) and both variations (roasted garlic and Parmesan). All tasted excellent. In the variations, the garlic and Parmesan were well balanced, not overwhelming but clearly present.

But despite the flavor, I was not overwhelmed by these breadsticks. Mine were certainly irregular and rustic looking, but were pencil thin, not thick. No doubt, this was Hamelman’s intention. And, while that might not be what Carol Field expects, it’s not a problem for me. The real problem is that the breadsticks did not brown well and lacked the crunch I’d expect from a thin breadstick. When making the variations, I tried upping the cooking time from 20 to 25 minutes, but that didn’t help. I also tried an egg glaze on some without much luck. (I also tried shorter, thicker breadsticks, but that exacerbated the problem.) Still, the taste is great.

So … this is a recipe that I’m not done with. Where do I go from here? It turns out, there are still lots of things to try. When I cooked these, I used a parchment lined baking sheet. I suspect this was a mistake so I plan to try these again without the parchment. I’d also like to see what effect a baking stone has. A higher temperature is also a reasonable thing to try. (Field says that in Turin these were traditionally baked on the floor of a wood burning stove.) I’d also like to try Field’s recipe to see how it compares. Finally, there are numerous variations to try. Hamelman suggests several and there are a half dozen or so variations in “The Italian Baker”.

I’ve made three trips to the freezer since I started writing this, so it’s time to stop. More to follow ….

Sunday, May 30, 2010

Pizza


Over the years, I've made a lot of pizza. It was probably the first bread I ever baked, and one of the things I bake most often. I have an ongoing quest to prefect my pizza recipes. I've even attended a Saturday morning pizza course at Johnson and Wales taught by Peter Reinhart. So as soon as pizza hit the recipe list for the Hamelman Challenge, I jumped on it.

I've made the recipe twice now. The first time I made one large pizza per the recipe and two smaller pizzas cutting the dough for the larger pizza in half, i.e. one 16 oz pizza and two 8 oz pizzas. The large pizza cooked for about 14 minutes, the smaller for about 10. I used tomato sauce, mahon cheese, and Italian sausage for the large; mushrooms, purple onions and cheese for one small pizza;and just cheese for the other small pizza. The mahon, something that I just had on hand, worked very well on the pizza.

The crust had a very nice flavor. It was a bit thicker than what I've been baking lately. I found it particularly easy to work with.

For the second pass, I replaced 25% of the flour with whole wheat flour. (Whole wheat worked well!) I made four 8 oz pizza. I put two of the dough balls, immediately after forming, into the freeze and one into the refrigerator. I'll report back on these later. I baked the one remaining pizza.

For the pizza I made, I used a technique describe in Blumenthal's "In Search of Perfection". I heated a cast iron pan on top of the stove to around 600 degrees (it was cooler at the edges), flipped the pan putting the pizza on the bottom of the pan, then placed the pan directly under the broiler, about 1 inch away. (I use an IR thermometer to judge the temperature of the pan.) This took about 3 minutes to cook. I used this technique before. It produces a super hot, quick cooking pizza that comes closer to a pizza oven than a pizza stone. The distinction between this and a stone cooked is noticeable---this technique is better but tricky. I still haven't mastered this technique.

I made a pizza with mahon, basil, fresh tomatoes, basil, bacon, and an egg. This is a variation of a recipe I first had at Peter Reinhart's restaurant, Pie Town in Charlotte. I was very pleased with the results. This is now my go-to recipe when making thicker crust pizzas.

Update (6/27/10): A day later I went back and made pizza from the dough in my refrigerator. Last week I pulled the dough from the freezer and put it into the refrigerator. After a few days in the refrigerator, I made pizza with the dough. In the case of the refrigerated dough, I got very little rise out of the dough giving a relatively flat dough. I say "relatively" because I actually got more rise out of it than the frozen dough which gave a very thin crust. My advise is, if you want to fix pizza dough in advance and refrigerate or freeze, go to one of Reinhart's recipes.

A Little Background

For those of you who might not be familiar with cookbook challenges, here is a brief introduction. The idea is a group of people get together, typically over the Internet, with the goal of working through a cookbook with each cook making each recipe in the book. The group determines the pace and order of the recipes---perhaps one recipe a week starting at the beginning of the book, or two or three recipes a month jumping around within the book. It is collaborative in that the members encourage one another and discuss the difficulties they encounter.

The first challenge I entered was the Bread Baker's Apprentice Challenge (at http://pinchmysalt.com/the-bba-challenge/) with the goal working through all of the recipes in Peter Reinhart's "The Bread Baker's Apprentice". I signed up for this challenge, and, in fact did bake my way through the book. But I never actually got around to creating a blog or a website to track my progress though the book.

I've set this blog up to track my progress for the Hamelman Challenge (at http://mellowbakers.com/), a challenge set up to work through the recipes in Jeffrey Hamelman's "Bread: A Baker's Book of Techniques and Recipes". I hope to do better this time around, but I'm already seriously behind. The challenge has been going since March, and while I've been baking I haven't been writing. Until I've caught up, I plan to enter what I currently baking and going back and filling in with occasional entries what I've already done.

My goal is to bake each recipe at least twice. The first time I plan to follow the recipe closely. The second time through, I will either address any problems I encountered or play with the recipe adapting it to my preferences.

(By the way if you are interested in other challenges, there is one for Peter Reinhart's "Artisan Breads for Everyday" (at http://www.cookbooker.com/challenge.php). I think it is probably a little late to join this one. I was a volunteer recipe tester for this book so I've already pretty much done all the recipes in the book. Another that you might consider is for Nick Malgieri's "Modern Baker" (at http://modernbakerchallenge.wordpress.com/). I seriously considered entering this challenge, but the pace is a bit slow, the cookbook doesn't have weights for ingredients, they are going through the book in order its written, and I'm more interested in bread. For now, I'll stick to Hamelman.)

Thursday, May 27, 2010

Traditional English Hot Cross Buns


Since hot cross buns are a favorite on mine, this seemed a great place to start the challenge.

When compared to what I usually think of as a hot cross bun, Hamelman’s recipe is a little unusual. First, rather than using the traditional fondant that piped onto the buns after baking, Hamelman uses a crossing paste that is added before baking so that it becomes an integral part of the bun. Second, after the buns are cooked, they are brushed with sugar syrup. This gives the buns a glossy appearance and extends their shelf life.

For my first pass at the buns, I followed the recipe fairly closely with only minor deviations. I did make my own candied lemon and orange peels—I used both. Having made the peels, I had a surfeit of flavored sugar syrup that I used rather than Hamelman’s.

For the candied peel, I used the recipe in Regan Daley’s In the Sweet Kitchen. She actually provides two variations, one in which the candied peel is kept in the syrup and another where the peel is removed from syrup and rolled in sugar. I made both. Eating the peel out-of-hand, I preferred the peel rolled in sugar. (You need to drain the peel carefully to get an even coating of sugar.) The peel in syrup seemed a little mushy—perhaps I could have shortened the cooking time. That said either was much better than any commercially prepared peel I’ve ever used. On the other hand, the homemade peel has a relatively short shelf life. Daley gave a shelf life of a couple of weeks, but I found they last a bit longer.
However both eventually molded.

I divided the dough for the buns making one batch with the sugared peel and another with the syrupy peel. I substituted chopped dried cherries for the currants in one batch. These produced very nice buns. The integrated crossing paste gave a very interesting appearance but really didn’t add much to the taste. I did not like the stickiness added from the syrup. As noted, the homemade candied peel was a great addition. Either worked well, but I actually preferred the peel in syrup in the buns. For my tastes, I really preferred the cherries to the currants.

For my second go at hot cross buns, I used Hamelman recipe but went back to a more common (perhaps less traditional) approach. I eliminated the crossing paste. Instead I piped on a lemon-flavored fondant after baking the buns; I eliminate the glaze using an egg wash in its place; I replaced the currants with 3 oz of chopped dried cherries (mixed sweet and sour) and 1 oz of dried cranberries; and I baked the buns in a pan so they would rise into each other giving a crust on top and bottom but softer sides. I lowered the temperature to 415 since I was using a darker pan and cooked the buns a bit longer. These rather plebeian changes gave a bun that more closely resembled what I typically think of as a hot cross bun, but also a product that I actually prefer.

Wednesday, May 26, 2010

Introduction


This is a temporary blog that I have created to record my progress with the Hamelman Bread Challenge, an Internet challenge to bake every recipe in Jeffrey Hamelman's "Bread: A Baker's Book of Techniques and Recipes".